
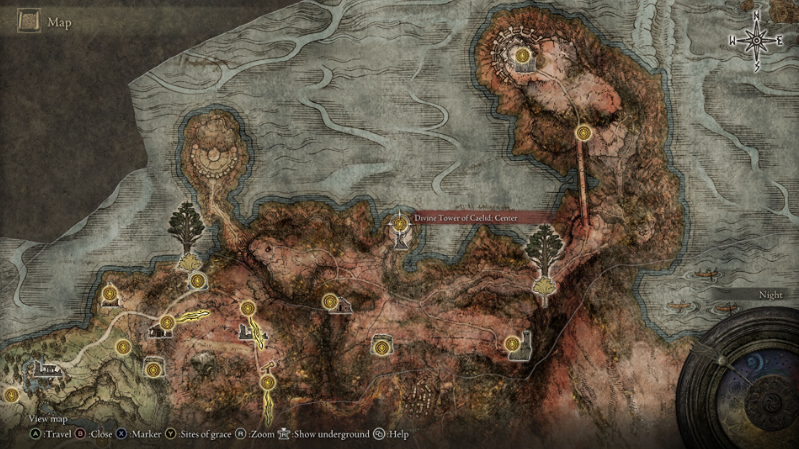
Elden Ring contains a location known as the Divine Tower of Caelid. Dragonbarrow is the location of the Divine Tower of Caelid which may be located there. The Dragonbarrow West Site of Grace is the starting point for the journey to this place. From there, players should continue northeast. This tower cannot be reached by the typical means; rather, it can only be reached by platforming carefully along its sides, beginning from the roots that stretch from the Dragonbarrow plateau towards the tower's sides and making use of the ledges and ladders that run around the tower's perimeter.
NPCs And Merchants In Elden Ring Divine Tower Of Caelid
No NPCs and Merchants is found at this location
Divine Tower Of Caelid Walkthrough
Restoring Radahn's Great Rune
After beating Starscourge Radahn and obtaining his Great Rune, visit this tower.
To enter the tower, summon Torrent from Dragonbarrow west Site of Grace and ride northeast. On the way, you can encounter a Teardrop Scarab on a dead tree root protruding from the ground. Kill it to acquire a Somber Smithing Stone [8]. Northeastward.
At the plateau's edge, a massive root protrudes towards the tower. Follow this root until you can safely jump to one of the tower's left ledges. Carefully remove the knight from the ledge. There are multiple pathways and objects to collect ahead. Take the ladder up and walk to the right to discover a foot soldier with a torch and a ladder. If you pass him, a soldier with a spear and tower shield guards a Stonesword Key. Return to the first pair of ladders, walk left, and jump across the triangular ledge with two cracks. If you're not confident platforming, you can still summon Torrent for a double leap. Kill the knight on the next ledge. Another triangular portion with right and left cracks is ahead. Next portion has another ladder-accessible ledge. Before rising, jump left to find a corpse with Numen's Rune. Climb the previous ladder to reach Divine Tower of Caelid: Center grace. Note: You can also go immediately to the Site of Grace and then use Torrent to double jump left to the Numen's Rune.
West of the Site of Grace, up the steps, is the main tower lift. The left door can be confused for the carvings on the center wall. Follow the steps around the balcony to the top floor and power up Radahn's Great Rune.
Tower Basement and Godskin Apostle
Tower's base has a boss. From Grace's Center, head east and down the steps. Two Radahn Knights and a locked door are here. Right below you will see a long concrete platform. Behind you are tiny ledges you can walk on. Jump onto a left-hand concrete platform. It will break and fall several stories below, but you won't be hurt.
Walk to the thinner area where the platform crashed and cautiously descend down. The body has a Golden Rune (12). Look down at the tower's right (north) side to see an unlit lamp. Carefully jump from this bulb to the concrete below. Jump onto the half-beam next to you, then down two more. You're closer to the tower's center with a knight to your left. Using ranged strikes, kill him, then ride the cage elevator up.
You'll arrive on a balcony with a ladder. This ladder goes to a place where you can unlock an earlier door if you die in the next segment. Down the ladder and along the passage, you'll encounter a Blackflame Monk. Beware of his powerful spells and quick blade. After beating the monk, look for a Rune Arc on his corpse. Left of the corpse is an outer-wall ledge. Follow it to a jumping platform below. Again, despite the long fall, you won't incur fall injury. Another cage elevator leads to the basement. After descending the lift, you'll locate the Basement Site of Grace. From here, descend the stairs and fight another monk to reach the boss door.
Godskin Apostle
The Godskin Apostle is a powerful boss with a sickle- and blade-end twinblade. He casts Black Flame spells like prior monks. Keep a safe distance from this boss and only attack when he opens up. His melee attacks are heavy, and he executes short wind-ups before attacking, like Margit at Stormveil.
When he uses Stab & Slash, you can get one or two hits in after his second strike. His Jumping Overhead Slash has a somewhat longer recovery and guarantees 2 hits. Both attacks are straightforward to avoid. You should avoid his Black Flame, which spreads swiftly; and his Stab & Pull, which hits twice for tremendous damage. Another technique is Spinning Weapon, in which he twirls his blade as he advances. Keep your distance or sneak past him.
When his HP reaches 60%, he floats briefly and then slams down, signaling his second phase. When he floats, run! From here, he can unlatch his top torso skin to increase his reach and unleash additional skills. During this phase, he attacks by flinging his upper torso outwards while twirling his sword. If you can dodge his weapon, you can strike his enlarged abdomen and legs while his torso is locked in animation.
He also has a move called Plunging Blade & Sweep, in which he thrusts his chest upwards and crashes his weapon down, followed by a wide sweeping cut. Both hits can be outranged or deflected, and he's defenseless following the sweep. He can also launch a Black Flame Whirlwind strike by twirling his sword, producing a whirlwind around him. The attack ends when he plunges his blade into the earth, causing the whirlwind to burst and spread. Even when the whirlwind has ceased, avoid the edge. The Godskin Apostle is vulnerable to magic damage, and his equanimity can be disrupted with multi-hit spells like Glintblade Phalanx or Glintstone Stars.
Defeating this Godskin Apostle rewards his armor set, including his hood, robe, bracelets, and pants. In the room behind him is the Godslayer's Greatsword Colossal Weapon.


